# Javascript
# JavaScript
JavaScript is an important component in many WordPress plugins. WordPress comes with a [variety of JavaScript libraries bundled with core](https://developer.wordpress.org/themes/basics/including-css-javascript/#default-scripts-included-and-registered-by-wordpress). One of the most commonly-used libraries in WordPress is jQuery because it is lightweight and easy to use. jQuery can be used in your plugin to manipulate the DOM object or to perform Ajax actions.
# AJAX
## What is AJAX?
AJAX is the acronym for Asynchronous JavaScript And XML. XML is a data exchange format and UX is software developer shorthand for User Experience. Ajax is an Internet communications technique that allows a web page displayed in a user's browser to request specific information from a server and display this new information on the same page without the need to reload the entire page. You can already imagine how this improves the user experience.
While XML is the traditional data exchange format used, the exchange can actually be any convenient format. When working with PHP code, many developers favor JSON because the internal data structure created from the transmitted data stream is easier to interface with.
To see AJAX in action, go to your WordPress administration area and add a category or tag. Pay close attention when you click the Add New button, notice the page changes but does not actually reload. Not convinced? Check your browser's back history, if the page had reloaded, you would see two entries for the page.
AJAX does not even require a user action to work. Google Docs automatically saves your document every few minutes with AJAX without you needing to initiate a save action.
## Why use AJAX?
Obviously, it improves the user experience. Instead of presenting a boring, static page, AJAX allows you to present a dynamic, responsive, user friendly experience. Users can get immediate feedback that some action they took was right or wrong. No need to submit an entire form before finding out there is a mistake in one field. Important fields can be validated as soon as the data is entered. Or suggestions could be made as the user types.
AJAX can dramatically decrease the amount of data flowing back and forth. Only the pertinent data needs to be exchanged instead of all of the page content, which is what happens when the page reloads.
Specifically related to WordPress plugins, AJAX is by far the best way to initiate a process independent of WordPress content. If you've programmed PHP before, you would likely do this by simply linking to a new PHP page. The user following the link initiates the process. The problem with this is that you cannot access any WordPress functions when you link to a new external PHP page. In the past, developers accessed WordPress functions by including the core file `wp-load.php` on their new PHP page. The problem with doing that is you cannot possibly know the correct path to this file anymore. The WordPress architecture is now flexible enough that the `/wp-content/` and your plugin files can be moved from its usual location to one level from the installation root. You cannot know where `wp-load.php` is relative to your plugin files, and you cannot know the absolute path to the installation folder either.
What you can know is where to send an AJAX request, because it is defined in a global JavaScript variable. Your PHP AJAX handler script is actually an action hook, so all WordPress functions are automatically available to it, unlike an external PHP file.
## How Do I Use AJAX?
If you are new to WordPress but have experience using AJAX in other environments, you will need to relearn a few things. The way WordPress implements AJAX is most likely different than what you are used to. If everything is new to you, no problem. You will learn the basics here. Once you've developed a basic AJAX exchange, it's a cinch to expand on that base and develop that killer app with an awesome user interface!
There are two major components of any AJAX exchange in WordPress. The client side JavaScript or jQuery and the server side PHP. All AJAX exchanges follow the following sequence of events.
1. Some sort of page event initiates a JavaScript or jQuery function. That function gathers some data from the page and sends it via a HTTP request to the server. Because handling HTTP requests with JavaScript is awkward and jQuery is bundled into WordPress anyway, we are going to focus only on jQuery code from here on out. AJAX with straight JavaScript is possible, but it's not worth doing it when jQuery is available.
2. The server receives the request and does something with the data. It may assemble related data and send it back to the client browser in the form of an HTTP response. This is not a requirement, but since keeping the user informed about what's going on is desirable, it's very rare not to send some kind of response.
3. The jQuery function that sent the initial AJAX request receives the server response and does something with it. It may update something on the page and/or present a message to the user by some means.
## Using AJAX with jQuery
Now we will define the "do stuff" portion from the [snippet in the article on jQuery](https://developer.wordpress.org/plugins/javascript/jquery/#selector-and-event). We will use the [`$.post()`](https://api.jquery.com/jQuery.post/ "jQuery Reference") method, which takes 3 parameters: the URL to send the POST request to, the data to send, and a callback function to handle the server response. Before we do that though, we have a bit of advance planning to get out of the way. We do the following assignment for use later in the callback function. The purpose will be more evident in the [Callback section](https://developer.wordpress.org/plugins/javascript/ajax/#callback "Page section").
### URL
All WordPress AJAX requests must be sent to `wp-admin/admin-ajax.php`. The correct, complete URL needs to come from PHP, jQuery cannot determine this value on its own, and you cannot hardcode the URL in your jQuery code and expect anyone else to use your plugin on their site. If the page is from the administration area, WordPress sets the correct URL in the global JavaScript variable ajaxurl. For a page from the public area, you will need to establish the correct URL yourself and pass it to jQuery using [`wp_localize_script()`](https://developer.wordpress.org/reference/functions/wp_localize_script/). This will be covered in more detail in the [PHP section](https://developer.wordpress.org/plugins/javascript/enqueuing/ "Server Side PHP and Enqueuing"). For now just know that the URL that will work for both the front and back end is available as a property of a global object that you will define in the PHP segment. In jQuery it is referenced like so:
```
my_ajax_obj.ajax_url
```
### Data
All data that needs to be sent to the server is included in the data array. Besides any data needed by your app, you must send an action parameter. For requests that could result in a change to the database you need to send a nonce so the server knows the request came from a legitimate source. Our example data array provided to the `.post()` method looks like this:
```
{
_ajax_nonce: my_ajax_obj.nonce, // nonce
action: "my_tag_count", // action
title: this.value // data
}
```
Each component is explained below.
### Nonce
[Nonce](https://developer.wordpress.org/apis/security/nonces/) is a portmanteau of "Number used ONCE". It is essentially a unique serial number assigned to each instance of any form served. The nonce is established with PHP script and passed to jQuery the same way the URL was, as a property in a global object. In this case it is referenced as my\_ajax\_obj.nonce.
[info]A true nonce needs to be refreshed every time it is used so the next AJAX call has a new, unused nonce to send as verification. As it happens, the WordPress nonce implementation is not a true nonce. The same nonce can be used as many times as necessary in a 24 hour period, unless you logout. Generating a nonce with the same seed phrase will always yield the same number for a 12 hour period after which a new number will finally be generated.
If your app needs serious security, implement a true nonce system where the server sends a new, fresh nonce in response to an Ajax request for the script to use to verify the next request.[/info]
It's easiest if you key this nonce value to \_ajax\_nonce. You can use a different key if it's coordinated with the PHP code verifying the nonce, but it's easier to just use the default value and not worry about coordination. Here is the way the declaration of this key-value pair appears:
```
_ajax_nonce: my_ajax_obj.nonce
```
### Action
All WordPress AJAX requests must include an action argument in the data. This value is an arbitrary string that is used in part to construct an action tag you use to hook your AJAX handler code. It's useful for this value to be a very brief description of the AJAX call's purpose. Unsurprisingly, the key for this value is _‘action'_. In this example, we will use `my_tag_count` as our action value. The declaration of this key-value pair looks like this:
```
action: "my_tag_count"
```
Any other data the server needs to do its task is also included in this array. If there are a lot of fields to transmit, there are two common formats to combine data fields into a single string for more convenient transmission, XML and JSON. Using these formats is optional, but whatever you do does need to be coordinated with the PHP script on the server side. More information on these formats is available in the following Callback section. It is more common to receive data in this format than to send it, but it can work both ways.
In our example, the server only needs one value, a single string for the selected book title, so we will use the key _‘title'_. In jQuery, the object that fired the event is always contained in the variable this. Accordingly, the value of the selected element is this.value. Our declaration of this key-value pair appears like so:
```
title: this.value
```
### Callback
The callback handler is the function to execute when a response comes back from the server after the request is made. Once again, we usually see an anonymous function here. The function is passed one parameter, the server response. The response could be anything from a yes or no to a huge XML database. JSON formatted data is also a useful format for data. The response is not even required. If there is none, then no callback need be specified. In the interest of UX, it's always a good idea to let the user know what happened to any request, so it is recommended to always respond and provide some indication that something happened.
In our example, we replace the current text following the radio input with the server response, which includes the number of posts tagged by the book title. Here is our anonymous callback function:
```
function( data ) {
this2.nextSibling.remove();
$( this2 ).after( data );
}
```
`data` contains the entire server response. Earlier we assigned to `this2` the object that triggered the change event (referenced as `this`) with the line var `this2` = `this;`. This is because variable scope in closures only extends one level. By assigning `this2` in the event handler (the part that initially just contained `/* do stuff */`), we are able to use it in the callback where this would be out of scope.
The server response can take on any form. Significant quantities of data should be encoded into a data stream for easier handling. XML and JSON are two common encoding schemes.
#### XML
XML is the old data exchange format for AJAX. It is after all the ‘X' in AJAX. It continues to be a viable exchange format even though it can be difficult to work with using native PHP functions. Many PHP programmers prefer the JSON exchange format for that reason. If you do use XML, the parsing method depends on the browser being used. Use Microsoft.XMLDOM ActiveX for Internet Explorer and use DOMParser for everything else. Note that [Internet Explorer is no longer supported by WordPress](https://make.wordpress.org/core/2021/04/22/ie-11-support-phase-out-plan/) since 5.8 release.
#### JSON
JSON is often favored for its light weight and ease of use. You can actually parse JSON using `eval()`, but don't do that! The use of `eval()` carries significant security risks. Instead, use a dedicated parser, which is also faster. Use the global instance of the parser object `JSON`. There are [specific functions to provide an easy way to give a response in JSON format](https://developer.wordpress.org/plugins/javascript/enqueuing/#json) to your AJAX call.
#### Other
As long as the data format is coordinated with the PHP handler, it can be any format you like, such as comma delimited, tab delimited, or any kind of structure that works for you.
#### Client Side Summary
Now that we've added our callback as the final parameter for the $.post() function, we've completed our sample jQuery Ajax script. All the pieces put together look like this:
```
jQuery(document).ready(function($) { //wrapper
$(".pref").change(function() { //event
var this2 = this; //use in callback
$.post(my_ajax_obj.ajax_url, { //POST request
_ajax_nonce: my_ajax_obj.nonce, //nonce
action: "my_tag_count", //action
title: this.value //data
}, function(data) { //callback
this2.nextSibling.remove(); //remove current title
$(this2).after(data); //insert server response
}
);
} );
} );
```
This script can either be output into a `block` on the web page or contained in its own file. This file can reside anywhere on the Internet, but most plugin developers place it in a `/js/` subfolder of the plugin's main folder. Unless you have reason to do otherwise, you may as well follow convention. For this example we will name our file `myjquery.js`.
# Server Side PHP and Enqueuing
There are two parts to the server side PHP script that are needed to implement AJAX communication. First we need to enqueue the jQuery script on the web page and localize any PHP values that the jQuery script needs. Second is the actual handling of the AJAX request.
## Enqueue Script
This section covers the two major quirks of AJAX in WordPress that trip up experienced coders new to WordPress. One is the need to enqueue scripts in order to get meta links to appear correctly in the page's head section. The other is that **all** AJAX requests need to be sent through `wp-admin/admin-ajax.php`. Never send requests directly to your plugin pages.
### Enqueue
Use the function [`wp_enqueue_script()`](https://developer.wordpress.org/reference/functions/wp_enqueue_script/) to get WordPress to insert a meta link to your script in the page's section. Never hardcode such links in the header template. As a plugin developer, you do not have ready access to the header template, but this rule bears mentioning anyway.
The enqueue function accepts five parameters as follows:
- `$handle` is the name for the script.
- `$src` defines where the script is located. For portability, use `plugins_url()` to build the proper URL. If you are enqueuing the script for something besides a plugin, use some related function to create a proper URL – never hardcode it.
- `$deps` is an array that can handle any script that your new script depends on, such as jQuery. Since we are using jQuery to send an AJAX request, you will at least need to list `'jquery'` in the array.
- `$ver` lets you list a version number.
- `$args` an array of arguments that define footer printing (via an `in_footer` key) and script loading strategies (via a `strategy` key) such as `defer` or `async`. This replaces/overloads the `$in_footer` parameter as of WordPress version 6.3.
```
wp_enqueue_script(
'ajax-script',
plugins_url( '/js/myjquery.js', __FILE__ ),
array( 'jquery' ),
'1.0.,0',
array(
'in_footer' => true,
)
);
```
You cannot enqueue scripts directly from your plugin code page when it is loaded. Scripts must be enqueued from one of a few action hooks – which one depends on what sort of page the script needs to be linked to. For administration pages, use `admin_enqueue_scripts`. For front-end pages use `wp_enqueue_scripts`, except for the login page, in which case use `login_enqueue_scripts`.
The `admin_enqueue_scripts` hook passes the current page filename to your callback. Use this information to only enqueue your script on pages where it is needed. The front-end version does not pass anything. In that case, use template tags such as `is_home()`, `is_single()`, etc. to ensure that you only enqueue your script where it is needed. This is the complete enqueue code for our example:
```
add_action( 'admin_enqueue_scripts', 'my_enqueue' );
function my_enqueue( $hook ) {
if ( 'myplugin_settings.php' !== $hook ) {
return;
}
wp_enqueue_script(
'ajax-script',
plugins_url( '/js/myjquery.js', __FILE__ ),
array( 'jquery' ),
'1.0.0',
array(
'in_footer' => true,
)
);
}
```
Why do we use a named function here but use anonymous functions with jQuery? Because closures are only recently supported by PHP. jQuery has supported them for quite some time. Since some people may still be running older versions of PHP, we always use named functions for maximum compatibility. If you have a recent PHP version and are developing only for your own installation, go ahead and use closures if you like.
#### Register vs. Enqueue
You will see examples in other tutorials that religiously use [`wp_register_script()`](https://developer.wordpress.org/reference/functions/wp_register_script/). This is fine, but its use is optional. What is not optional is `wp_enqueue_script()`. This function must be called in order for your script file to be properly linked on the web page. So why register scripts? It creates a useful tag or handle with which you can easily reference the script in various parts of your code as needed. If you just need your script loaded and are not referencing it elsewhere in your code, there is no need to register it.
#### Delayed Script Loading
WordPress provides support for specifying a script loading strategy via the `wp_register_script()` and `wp_enqueue_script()` functions, by way of the `strategy` key within the new `$args` array parameter introduced in WordPress 6.3.
Supported strategies are as follows:
- **defer**
- Added by specifying an array key value pair of `'strategy' => 'defer'` to the $args parameter.
- Scripts marked for deferred execution — via the defer script attribute — are only executed once the DOM tree has fully loaded (but before the `DOMContentLoaded` and window load events). Deferred scripts are executed in the same order they were printed/added in the DOM, unlike asynchronous scripts.
- **async**
- Added by specifying an array key value pair of `'strategy' => 'async'` to the `$args` parameter.
- Scripts marked for asynchronous execution — via the `async` script attribute — are executed as soon as they are loaded by the browser. Asynchronous scripts do not have a guaranteed execution order, as script B (although added to the DOM after script A) may execute first given that it may complete loading prior to script A. Such scripts may execute either before the DOM has been fully constructed or after the `DOMContentLoaded` event.
Following is an example of specifying a loading strategy for an additional script enqueue within our plugin:
```
wp_register_script(
'ajax-script-two',
plugins_url( '/js/myscript.js', __FILE__ ),
array( ajax-script ),
'1.0.,0',
array(
'strategy' => 'defer',
)
);
```
The same approach applies when using `wp_enqueue_script()`. In the example above, we indicate that we intend to load the `'ajax-script-two'` script in a deferred manner.
When specifying a delayed script loading strategy, consideration of the script's dependency tree (its dependencies and/or dependents) is taken into account when deciding on an “eligible strategy” so as not to result in application of a strategy that is valid for one script but detrimental to others in the tree by causing an unintended out of order of execution. As a result of such logic, the intended loading strategy that you pass via the `$args` parameter may not be the final (chosen) strategy, but it will never be detrimental to (or stricter than) the intended strategy.
### Nonce
You need to create a nonce so that the jQuery AJAX request can be validated as a legitimate request instead of a potentially nefarious request from some unknown bad actor. Only your PHP script and your jQuery script will know this value. When the request is received, you can verify it is the same value created here. This is how to create a nonce for our example:
```
$title_nonce = wp_create_nonce( 'title_example' );
```
The parameter `title_example` can be any arbitrary string. It's suggested the string be related to what the nonce is used for, but it can really be anything that suits you.
### Localize
If you recall from the [jQuery Section](https://developer.wordpress.org/plugins/javascript/jquery/), data created by PHP for use by jQuery was passed in a global object named `my_ajax_obj`. In our example, this data was a nonce and the complete URL to `admin-ajax.php`. The process of assigning object properties and creating the global jQuery object is called **localizing**. This is the localizing code used in our example which uses [`wp_localize_script()`](https://developer.wordpress.org/reference/functions/wp_localize_script/).
```
wp_localize_script(
'ajax-script',
'my_ajax_obj',
array(
'ajax_url' => admin_url( 'admin-ajax.php' ),
'nonce' => $title_nonce,
)
);
```
Note how our script handle `ajax-script` is used so that the global object is assigned to the right script. The object is global to our script, not to all scripts. Localization can also be called from the same hook that is used to enqueue scripts. The same goes for creating a nonce, though that particular function can be called virtually anywhere. All of that combined together in a single hook callback looks like this:
```
add_action( 'admin_enqueue_scripts', 'my_enqueue' );
/**
* Enqueue my scripts and assets.
*
* @param $hook
*/
function my_enqueue( $hook ) {
if ( 'myplugin_settings.php' !== $hook ) {
return;
}
wp_enqueue_script(
'ajax-script',
plugins_url( '/js/myjquery.js', __FILE__ ),
array( 'jquery' ),
'1.0.0',
true
);
wp_localize_script(
'ajax-script',
'my_ajax_obj',
array(
'ajax_url' => admin_url( 'admin-ajax.php' ),
'nonce' => wp_create_nonce( 'title_example' ),
)
);
}
```
[info]Remember to only add this nonce localization to the needed pages, do not display a nonce to someone who should not use it. And remember to use `current_user_can()` with a capability or role to complete the security.[/info]
## AJAX Action
The other major part of the server side PHP code is the actual AJAX handler that receives the POSTed data, does something with it, then sends an appropriate response back to the browser. This takes on the form of a WordPress [action hook](https://developer.wordpress.org/plugins/hooks/actions/). Which hook tag you use depends on whether the user is logged in or not and what value your jQuery script passed as the _action:_ value.
[info]`$_GET`, `$_POST`, and `$_COOKIE` vs. `$_REQUEST`
You've probably used one or more of the PHP super globals such as `$_GET` or `$_POST` to retrieve values from forms or cookies (using `$_COOKIE`). Maybe you prefer `$_REQUEST` instead, or at least have seen it used. It's kind of cool – regardless of the request method, `POST` or `GET`, it will have the form values. Works great for pages that use both methods. On top of that, it has cookie values as well. One stop shopping! Therein lies its tragic flaw. In the case of a name conflict, the cookie value will override any form values. Thus it is ridiculously easy for a bad actor to craft a counterfeit cookie on their browser, which will overwrite any form value you might be expecting from the request. `$_REQUEST` is an easy route for hackers to inject arbitrary data into your form values. To be extra safe, stick to the specific variables and avoid the one size fits all.[/info]
Since our AJAX exchange is for the plugin's settings page, the user must be logged in. If you recall from the [jQuery section](https://developer.wordpress.org/plugins/javascript/jquery/), the `action:` value is `"my_tag_count"`. This means our action hook tag will be `wp_ajax_my_tag_count`. If our AJAX exchange were to be utilized by users who were not currently logged in, the action hook tag would be `wp_ajax_nopriv_my_tag_count` The basic code used to hook the action looks like this:
```
add_action( 'wp_ajax_my_tag_count', 'my_ajax_handler' );
/**
* Handles my AJAX request.
*/
function my_ajax_handler() {
// Handle the ajax request here
wp_die(); // All ajax handlers die when finished
}
```
The first thing your AJAX handler should do is verify the nonce sent by jQuery with [`check_ajax_referer()`](https://developer.wordpress.org/reference/functions/check_ajax_referer/), which should be the same value that was localized when the script was enqueued.
```
check_ajax_referer( 'title_example' );
```
The provided parameter must be identical to the parameter provided [earlier](https://developer.wordpress.org/plugins/javascript/enqueuing/#php-nonce) to `wp_create_nonce()`. The function simply dies if the nonce does not check out. If this were a true nonce, now that it was used, the value is no longer any good. You would then generate a new one and send it to the callback script so that it can be used for the next request. But since WordPress nonces are good for twenty-four hours, you needn't do anything but check it.
### Data
With the nonce out of the way, our handler can deal with the data sent by the jQuery script contained in `$_POST['title']`. First we assign the value to a new variable, after running it through [`wp_unslash()`](https://developer.wordpress.org/reference/functions/wp_unslash/) to remove any unexpected quotes.
```
$title = wp_unslash( $_POST['title'] );
```
We can save the user's selection in user meta by using [`update_user_meta()`](https://developer.wordpress.org/reference/functions/update_user_meta/).
```
update_user_meta( get_current_user_id(), 'title_preference', sanitize_post_title( $title ) );
```
Then we build a query in order to get the post count for the selected title tag.
```
$args = array(
'tag' => $title,
);
$the_query = new WP_Query( $args );
```
Finally we can send the response back to the jQuery script. There's several ways to transmit data. Let's look at some of the options before we deal with the specifics of our example.
#### XML
PHP support for XML leaves something to be desired. Fortunately, WordPress provides the [`WP_Ajax_Response`](https://developer.wordpress.org/reference/classes/wp_ajax_response/) class to make the task easier. The [`WP_Ajax_Response`](https://developer.wordpress.org/reference/classes/wp_ajax_response/) class will generate an XML-formatted response, set the correct content type for the header, output the response xml, then die — ensuring a proper XML response.
#### JSON
This format is lightweight and easy to use, and WordPress provides the [`wp_send_json`](https://developer.wordpress.org/reference/functions/wp_send_json/) function to json-encode your response, print it, and die — effectively replacing [`WP_Ajax_Response`](https://developer.wordpress.org/reference/classes/wp_ajax_response/). WordPress also provides the [`wp_send_json_success`](https://developer.wordpress.org/reference/functions/wp_send_json_success/) and [`wp_send_json_error`](https://developer.wordpress.org/reference/functions/wp_send_json_error/) functions, which allow the appropriate done() or fail() callbacks to fire in JS.
#### Other
You can transfer data any way you like, as long as the sender and receiver are coordinated. Text formats like comma delimited or tab delimited are one of many possibilities. For small amounts of data, sending the raw stream may be adequate. That is what we will do with our example – we will send the actual replacement HTML, nothing else.
```
echo esc_html( $title ) . ' (' . $the_query->post_count . ') ';
```
In a real world application, you must account for the possibility that the action could fail for some reason–for instance, maybe the database server is down. The response should allow for this contingency, and the jQuery script receiving the response should act accordingly, perhaps telling the user to try again later.
### Die
When the handler has finished all of its tasks, it needs to die. If you are using the [`WP_Ajax_Response`](https://developer.wordpress.org/reference/classes/wp_ajax_response/) or `wp_send_json*` functions, this is automatically handled for you. If not, simply use the WordPress [`wp_die()`](https://developer.wordpress.org/reference/functions/wp_die/) function.
### AJAX Handler Summary
The complete AJAX handler for our example looks like this:
```
/**
* AJAX handler using JSON
*/
function my_ajax_handler__json() {
check_ajax_referer( 'title_example' );
$title = wp_unslash( $_POST['title'] );
update_user_meta( get_current_user_id(), 'title_preference', sanitize_post_title( $title ) );
$args = array(
'tag' => $title,
);
$the_query = new WP_Query( $args );
wp_send_json( esc_html( $title ) . ' (' . $the_query->post_count . ') ' );
}
/**
* AJAX handler not using JSON.
*/
function my_ajax_handler() {
check_ajax_referer( 'title_example' );
$title = wp_unslash( $_POST['title'] );
update_user_meta( get_current_user_id(), 'title_preference', sanitize_post_title( $title ) );
$args = array(
'tag' => $title,
);
$the_query = new WP_Query( $args );
echo esc_html( $title ) . ' (' . $the_query->post_count . ') ';
wp_die(); // All ajax handlers should die when finished
}
```
# Heartbeat API
The Heartbeat API is a simple server polling API built in to WordPress, allowing near-real-time frontend updates.
## How it works
When the page loads, the client-side heartbeat code sets up an interval (called the "tick") to run every 15-120 seconds. When it runs, heartbeat gathers data to send via a jQuery event, then sends this to the server and waits for a response. On the server, an admin-ajax handler takes the passed data, prepares a response, filters the response, then returns the data in JSON format. The client receives this data and fires a final jQuery event to indicate the data has been received.
The basic process for custom Heartbeat events is:
1. Add additional fields to the data to be sent (JS `heartbeat-send` event).
2. Detect sent fields in PHP, and add additional response fields (`heartbeat_received` filter).
3. Process returned data in JS (JS `heartbeat-tick`).
(You can choose to use only one or two of these events, depending on what functionality you need.)
## Using the API
Using the heartbeat API requires two separate pieces of functionality: send and receive callbacks in JavaScript, and a server-side filter to process passed data in PHP.
### Sending Data to the Server
When Heartbeat sends data to the server, you can include custom data. This can be any data you want to send to the server, or a simple true value to indicate you are expecting data.
```
jQuery( document ).on( 'heartbeat-send', function ( event, data ) {
// Add additional data to Heartbeat data.
data.myplugin_customfield = 'some_data';
});
```
### Receiving and Responding on the Server
On the server side, you can then detect this data, and add additional data to the response.
```
/**
* Receive Heartbeat data and respond.
*
* Processes data received via a Heartbeat request, and returns additional data to pass back to the front end.
*
* @param array $response Heartbeat response data to pass back to front end.
* @param array $data Data received from the front end (unslashed).
*
* @return array
*/
function myplugin_receive_heartbeat( array $response, array $data ) {
// If we didn't receive our data, don't send any back.
if ( empty( $data['myplugin_customfield'] ) ) {
return $response;
}
// Calculate our data and pass it back. For this example, we'll hash it.
$received_data = $data['myplugin_customfield'];
$response['myplugin_customfield_hashed'] = sha1( $received_data );
return $response;
}
add_filter( 'heartbeat_received', 'myplugin_receive_heartbeat', 10, 2 );
```
Back on the frontend, you can then handle receiving this data back.
```
jQuery( document ).on( 'heartbeat-tick', function ( event, data ) {
// Check for our data, and use it.
if ( ! data.myplugin_customfield_hashed ) {
return;
}
alert( 'The hash is ' + data.myplugin_customfield_hashed );
});
```
Not every feature will need all three of these steps. For example, if you don’t need to send any data to the server, you can use just the latter two steps.
# jQuery
## Using jQuery
Your jQuery script runs on the user's browser after your WordPress webpage is received. A basic jQuery statement has two parts: a selector that determines which HTML elements the code applies to, and an action or event, which determines what the code does or what it reacts to. The basic event statement looks like this:
```
jQuery.(selector).event(function);
```
When an event, such as a mouse click, occurs in an HTML element selected by the selector, the function that is defined inside the final set of parentheses is executed.
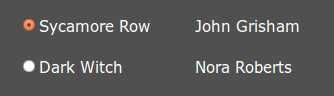
All the following code examples are based on this HTML page content. Assume it appears on your plugin's admin settings screen, defined by the file `myplugin_settings.php`. It is a simple table with radio buttons next to each title.
```
```
The output could look something like this on your settings page.
In the [article on AJAX](https://developer.wordpress.org/plugins/javascript/ajax/), we will build an AJAX exchange that saves the user selection in usermeta and adds the number of posts tagged with the selected title. Not a very practical application, but it illustrates all the important steps. jQuery code can either reside in an external file or be output to the page inside a `