Features
Model Context Protocol (MCP) Integration
Introduction
WooCommerce registers product and order abilities in WordPress. With the MCP Adapter plugin, AI clients can discover and run these store operations through the Model Context Protocol (MCP), subject to WordPress and WooCommerce permissions.
:::info
Developer Preview Notice The MCP implementation in WooCommerce is currently in developer preview. Implementation details, APIs, and integration patterns may change in future releases as the feature matures.
:::
Enabling MCP Integration
WooCommerce always registers its abilities through the WordPress Abilities API; there is no WooCommerce setting to turn on. To make them available to MCP clients, install and activate the MCP Adapter plugin:
wp plugin install mcp-adapter --activate
WooCommerce does not bundle the MCP adapter.
Authentication and Security
WordPress Application Password Requirements
Remote HTTP connections authenticate using a WordPress username and an Application Password. Do not use your account password or a WooCommerce REST API key.
To create an Application Password:
- In the WordPress dashboard, navigate to Users → Profile.
- Under Application Passwords, enter a name for the MCP client.
- Click Add New Application Password.
- Copy the generated password and store it securely. WordPress only displays it once.
Use the WordPress username and generated password as WP_API_USERNAME and WP_API_PASSWORD in the remote proxy configuration. Application Passwords can be revoked independently from the user's profile.
HTTPS Enforcement
Use HTTPS for remote HTTP connections so credentials are encrypted in transit. Local STDIO connections authenticate through WP-CLI using the configured --user and do not require an Application Password.
Permission Validation
The MCP Adapter authenticates requests as the WordPress user associated with the Application Password. The default server requires an authenticated user with the read capability, and each WooCommerce ability also enforces its own permission callback. Use a dedicated WordPress user with only the capabilities the MCP client needs.
Server Endpoint
WooCommerce abilities are available through the WordPress MCP Adapter's default server:
https://yourstore.com/wp-json/mcp/mcp-adapter-default-server
The WooCommerce-specific /wp-json/woocommerce/mcp endpoint was removed in WooCommerce 11.3. See Removed in WooCommerce 11.3.
Connecting to the MCP Server
Choose a connection method based on where the WordPress site is running. For a detailed overview and application-specific instructions, see Connecting AI applications and the wordpress/mcp-adaptor repository.
Local Sites Using STDIO
For a local WordPress installation, MCP clients can connect directly through the MCP Adapter's WP-CLI command. The client needs access to the WordPress files and a working WP-CLI installation.
JSON Configuration
Add the following server to your MCP client configuration. Replace the WordPress path and user with values from your local environment:
{
  "mcpServers": {
    "woocommerce_store": {
      "command": "wp",
      "args": [
        "--path=/path/to/your/wordpress/site",
        "mcp-adapter",
        "serve",
        "--server=mcp-adapter-default-server",
        "--user=admin"
      ]
    }
  }
}
Claude Desktop, Claude Code, and Cursor use the mcpServers property shown above. For VS Code, use servers instead.
Command-Line Configuration
Claude Code users can add the same server from the command line:
claude mcp add woocommerce_store -- \
  wp --path=/path/to/your/wordpress/site \
  mcp-adapter serve \
  --server=mcp-adapter-default-server \
  --user=admin
You can verify the server directly with WP-CLI:
echo '{"jsonrpc":"2.0","id":1,"method":"tools/list","params":{}}' | \
  wp --path=/path/to/your/wordpress/site \
  mcp-adapter serve \
  --server=mcp-adapter-default-server \
  --user=admin
Remote Sites Using HTTP
For a remote WordPress installation, use the @automattic/mcp-wordpress-remote proxy. The proxy translates the MCP client's local STDIO messages into HTTP requests to the WordPress MCP Adapter.
Before connecting:
- Create or select a dedicated WordPress user with the minimum required capabilities.
- Open the user's Profile screen and create a WordPress Application Password.
- Confirm the site uses HTTPS and non-Plain permalinks.
JSON Configuration
Add the following server to your MCP client configuration. Replace the example URL, username, and Application Password:
{
  "mcpServers": {
    "woocommerce_store": {
      "command": "npx",
      "args": [
        "-y",
        "@automattic/mcp-wordpress-remote@latest"
      ],
      "env": {
        "WP_API_URL": "https://yourstore.com/wp-json/mcp/mcp-adapter-default-server",
        "WP_API_USERNAME": "your-username",
        "WP_API_PASSWORD": "your-application-password"
      }
    }
  }
}
Claude Desktop, Claude Code, and Cursor use the mcpServers property shown above. For VS Code, use servers instead. Do not commit a configuration containing an Application Password to version control.
Command-Line Configuration
Claude Code users can add the remote server from the command line:
claude mcp add \
  --env WP_API_URL=https://yourstore.com/wp-json/mcp/mcp-adapter-default-server \
  --env WP_API_USERNAME=your-username \
  --env WP_API_PASSWORD='your-application-password' \
  woocommerce_store \
  -- npx -y @automattic/mcp-wordpress-remote@latest
Troubleshooting: For common setup issues with npx versions or SSL in local environments, see the mcp-wordpress-remote troubleshooting guide.
Discover WooCommerce Abilities
The default MCP server exposes three tools: mcp-adapter-discover-abilities, mcp-adapter-get-ability-info, and mcp-adapter-execute-ability. A tools/list response shows these adapter tools, not a separate tool for each WooCommerce ability. Use the discovery tool to list available abilities, then get an ability's schema before executing it.
For a local site, you can check discovery with WP-CLI:
echo '{"jsonrpc":"2.0","id":1,"method":"tools/call","params":{"name":"mcp-adapter-discover-abilities","arguments":{}}}' | \
  wp --path=/path/to/your/wordpress/site \
  mcp-adapter serve \
  --server=mcp-adapter-default-server \
  --user=admin
On a WooCommerce 11.3 site, the response should include abilities such as woocommerce/products-query and woocommerce/order-notes-query. Each ability checks permissions when it runs. See the MCP Adapter default server guide for the discovery and execution flow.
Background
The Model Context Protocol (MCP) is an open standard that enables AI applications to securely connect to external data sources and tools. Using MCP with WooCommerce relies on two core technologies:
- WordPress Abilities API - A standardized system for registering capabilities in WordPress, included in WordPress core
- WordPress MCP Adapter - The core MCP protocol implementation, installed as the MCP Adapter plugin
This architecture allows WooCommerce to expose operations as MCP tools through the flexible WordPress Abilities system while maintaining existing security and permission models.
What's Available
WooCommerce registers purpose-built abilities for core store operations. These abilities are available through the WordPress Abilities API and can be surfaced through the shared WordPress MCP adapter.
Purpose-Built WooCommerce Abilities
Product Management
- Query products with filtering and pagination
- Create new products
- Update existing products
- Delete products
Order Management
- Query orders with filtering and pagination
- Query notes for an order (
woocommerce/order-notes-query) - Update order status
- Add order notes
All operations respect WooCommerce's existing permission system. MCP clients authenticate through the MCP Adapter as a WordPress user.
Removed in WooCommerce 11.3
WooCommerce 11.3 removed the deprecated WooCommerce MCP endpoint and everything that only existed to support it:
- The
/wp-json/woocommerce/mcpendpoint and its WooCommerce REST API key authentication (X-MCP-API-Key). Requests to the endpoint now return HTTP 410 with a JSON-RPC error that explains how to connect through the MCP Adapter. - The REST-derived product and order abilities (
woocommerce/products-list,woocommerce/orders-get, and similar), along with thewoocommerce_mcp_include_ability,woocommerce_mcp_allow_insecure_transport, andwoocommerce_check_rest_ability_permissions_for_methodfilters and theexpose_in_deprecated_woocommerce_mcpability metadata.
Custom abilities registered by extensions or custom code that appeared in the removed endpoint don't carry over automatically. Before WooCommerce 10.9, the endpoint included abilities in the woocommerce/ namespace; from 10.9, it included abilities with expose_in_deprecated_woocommerce_mcp set to true; and the woocommerce_mcp_include_ability filter could add or remove abilities in either version. The MCP Adapter's default server ignores all of these. It only exposes an ability when its meta.mcp.public is true (if meta.mcp.public is not set, the adapter falls back to the top-level meta.public). To keep a custom ability available to MCP clients, set that metadata as shown in Adding Custom Abilities.
To keep using WooCommerce with MCP, install the MCP Adapter plugin and connect your MCP client to its default server, as described in Connecting to the MCP Server. Stores that had the WooCommerce MCP feature enabled see an admin notice about the change.
:::warning
Data Privacy Notice Order and customer operations may expose personally identifiable information (PII) including names, email addresses, physical addresses, and payment details. You are responsible for ensuring compliance with applicable data protection regulations. Connect MCP clients as a dedicated WordPress user with only the capabilities they need, revoke Application Passwords you no longer use, and follow your organization's data retention and handling policies.
:::
Architecture
Data Flow Overview
The MCP integration uses a multi-layered architecture to bridge between MCP clients and WordPress:
AI Client (Claude, etc.)
    ↓ (MCP protocol over stdio/JSON-RPC)
Local MCP Proxy (mcp-wordpress-remote)
    ↓ (HTTP/HTTPS requests with authentication)
Remote WordPress MCP Server (mcp-adapter)
    ↓ (WordPress Abilities API)
WooCommerce Abilities
    ↓ (REST API calls or direct operations)
WooCommerce Core
Architecture Components
Local MCP Proxy (mcp-wordpress-remote)
- Runs locally on the developer's machine as a Node.js process
- Converts MCP protocol messages to HTTP requests
- Handles authentication header injection
- Bridges the protocol gap between MCP clients and WordPress REST endpoints
Remote WordPress MCP Server (mcp-adapter)
- Is provided by the MCP Adapter plugin, which must be installed and active
- Powers MCP tool discovery and execution for WordPress abilities
WordPress Abilities System
- Provides a standardized way to register and execute capabilities
- Acts as an abstraction layer between MCP tools and actual operations
- Enables flexible implementation approaches (direct operations, REST bridging, and so on)
Core Components
Abilities Registry (AbilitiesRegistry.php)
- Initializes WooCommerce ability categories and loaders
- Bridges WordPress Abilities API with WooCommerce operations
- Enables ability discovery for MCP servers and other Abilities API consumers
Purpose-Built Domain Abilities (Domain)
- Provide WooCommerce product and order abilities backed by domain APIs
- Use shared WordPress MCP adapter metadata (
mcp.publicandmcp.type) for MCP exposure - Keep the ability contract focused on agent-friendly store operations
Implementation Approach
WooCommerce implements its abilities as purpose-built domain abilities. These abilities use schemas and response shapes designed for agent workflows instead of automatically projecting every REST-shaped operation into MCP.
Extending MCP Capabilities
Third-party plugins can register additional abilities using the WordPress Abilities API. Abilities can be implemented in various ways, including direct operations, custom logic, REST endpoint bridging, or external integrations.
Adding Custom Abilities
Register an ability category first, then register the ability during the WordPress Abilities API init hook:
add_action( 'wp_abilities_api_categories_init', function() {
    if ( ! function_exists( 'wp_register_ability_category' ) ) {
        return;
    }

    if ( function_exists( 'wp_has_ability_category' ) && wp_has_ability_category( 'your-plugin' ) ) {
        return;
    }

    wp_register_ability_category(
        'your-plugin',
        array(
            'label'       => __( 'Your Plugin', 'your-plugin' ),
            'description' => __( 'Abilities provided by Your Plugin.', 'your-plugin' ),
        )
    );
});

add_action( 'wp_abilities_api_init', function() {
    if ( ! function_exists( 'wp_register_ability' ) ) {
        return;
    }

    wp_register_ability(
        'your-plugin/custom-operation',
        array(
            'label'               => __( 'Custom Store Operation', 'your-plugin' ),
            'description'         => __( 'Performs a custom store operation.', 'your-plugin' ),
            'category'            => 'your-plugin',
            'execute_callback'    => 'your_custom_ability_handler',
            'permission_callback' => function () {
                return current_user_can( 'manage_woocommerce' );
            },
            'input_schema'        => array(
                'type'       => 'object',
                'properties' => array(
                    'store_id' => array(
                        'type'        => 'integer',
                        'description' => 'Store identifier',
                    ),
                ),
                'required' => array( 'store_id' ),
            ),
            'output_schema' => array(
                'type'       => 'object',
                'properties' => array(
                    'success' => array(
                        'type'        => 'boolean',
                        'description' => 'Operation result',
                    ),
                ),
            ),
            'meta'                => array(
                'show_in_rest' => true,
                'mcp'          => array(
                    'public' => true,
                    'type'   => 'tool',
                ),
            ),
        )
    );
});
The mcp.public and mcp.type metadata tells the shared WordPress MCP adapter that the ability can be exposed as an MCP tool. The show_in_rest metadata exposes the ability through the Abilities API REST routes.
Development Example
For a complete working example, see the WooCommerce MCP Ability Demo Plugin. This demonstration plugin shows how third-party developers can:
- Register custom abilities using the WordPress Abilities API
- Define comprehensive input and output schemas
- Implement proper permission handling
- Integrate with MCP through the shared WordPress MCP adapter
The demo plugin creates a woocommerce-demo/store-info ability that retrieves store information and statistics, demonstrating the integration patterns for extending WooCommerce MCP capabilities while using a direct implementation approach rather than REST endpoint bridging.
Troubleshooting
Common Issues
MCP Server Not Available
- Verify the MCP Adapter plugin is installed and active
- Confirm the client connects to
/wp-json/mcp/mcp-adapter-default-server, not the removed/wp-json/woocommerce/mcpendpoint
Authentication Failures
- Confirm
WP_API_USERNAMEmatches the WordPress user that created the Application Password - Confirm
WP_API_PASSWORDcontains an active Application Password, not the user's account password or a WooCommerce REST API key - Verify the WordPress user has the capabilities required by the ability
- Ensure HTTPS is used for remote HTTP connections
Ability Not Found
- Confirm the ability category is registered during
wp_abilities_api_categories_init - Confirm abilities are registered during
wp_abilities_api_init - Verify ability callbacks are accessible
Check WooCommerce → Status → Logs for entries with source woocommerce-abilities.
Important Considerations
- Developer Preview: This feature is in preview status and may change
- Implementation Approach: WooCommerce uses purpose-built domain abilities
- Breaking Changes: Future updates may introduce breaking changes
- Production Testing: Thoroughly test before deploying to production
- API Stability: The WordPress Abilities API and MCP adapter are evolving
Related Resources
- WordPress Abilities API Repository
- WordPress MCP Adapter Repository
- WooCommerce MCP Demo Plugin
- Model Context Protocol Specification
- WooCommerce REST API Documentation
High Performance Order Storage (HPOS)
WooCommerce has traditionally stored store orders and related order information (like refunds) as custom WordPress post types or post meta records. This comes with performance issues.
High-Performance Order Storage (HPOS) also previously known as "Custom Order Tables" is a solution that provides an easy-to-understand and solid database structure - specifically designed for eCommerce needs. It uses the WooCommerce CRUD design to store order data in custom tables - optimized for WooCommerce queries with minimal impact on the store's performance.
In January 2022, we published the initial plan for the Custom Order Tables feature and since then, we've been working hard to bring the High-Performance Order Storage (HPOS) to WooCommerce Core. In May 2022, we invited you to test the order migration process and provide feedback on how our initial work performs on real stores of varied configurations.
From WooCommerce 8.2, released on October 2023, High-Performance Order Storage (HPOS) is officially released under the stable flag and will be enabled by default for new installations.
What's New with High-Performance Order Storage?
Bringing High-Performance Order Storage (HPOS) to WooCommerce improves these three essential properties for eCommerce stores.
Scalability
The rise in the number of customers and customer orders increases the load on your store's database - making it difficult to handle customer order requests and deliver a seamless user experience.
With High-Performance Order Storage, you get dedicated tables for data like orders and order addresses and thus dedicated indexes which results in fewer read/write operations and fewer busy tables. This feature enables eCommerce stores of all shapes and sizes to scale their business to their maximum potential - without expert intervention.
Reliability
High-Performance Order Storage makes implementing and restoring targeted data backup easier. You'll no longer need to worry about losing orders, inventory numbers, or client information with reliable backup in these custom order tables. It'll also facilitate implementing read/write locks and prevent race conditions.
Simplicity
You no longer have to go through a single huge database to locate underlying data and WooCommerce entries.
With High-Performance Order Storage, you can easily browse through the separate tables and easy-to-handle entries, independent of the table _posts, to find data or understand the table structure. It also lets you easily develop new plugins, implement designs for shops and products, and modify WooCommerce with more flexibility.
Background
Before the release of version 8.2, WooCommerce relied on the _post and _postmeta table structures to store order information, which has served well over the years.
However, High-Performance Order Storage introduces dedicated tables for data like orders and order addresses and thus dedicated indexes which results in fewer read/write operations and fewer busy tables. This feature enables eCommerce stores of all shapes and sizes to scale their business to their maximum potential - without expert intervention.
The order data is synced from _posts and _postmeta table to four custom order tables:
_wc_orders_wc_order_addresses_wc_order_operational_data_wc_orders_meta
Enabling the feature
From WooCommerce 8.2, released on October 2023, HPOS is enabled by default for new installations. Existing stores can check How to enable HPOS
Database tables
A number of database tables are used to store order data by HPOS. The get_all_table_names method in the OrdersTableDataStore class will return the names of all the tables.
Authoritative tables
At any given time, while the HPOS feature is enabled, there are two roles for the involved database tables: authoritative and backup. The authoritative tables are the working tables, where order data will be stored to and retrieved from during normal operation of the store. The backup tables will receive a copy of the authoritative data whenever synchronization happens.
If the woocommerce_custom_orders_table_enabled options is set to true, HPOS is active and the new tables are authoritative, while the posts and post meta tables act as the backup tables. If the option is set to false, it's the other way around. The option can be changed via admin UI (WooCommerce - Settings - Advanced - Custom data stores).
The CustomOrdersTableController class hooks on the woocommerce_order_data_store filter so that WC_Data_Store::load( 'order' ); will return either an instance of OrdersTableDataStore or an instance of WC_Order_Data_Store_CPT, depending on which are the authoritative tables.
In order to preserve data integrity, switching the authoritative tables (from the new tables to the posts table or the other way around) isn't allowed while there are orders pending synchronization.
Synchronization
Synchronization is the process of applying all the pending changes in the authoritative tables to the backup tables. Orders pending synchronization are orders that have been modified in the authoritative tables but the changes haven't been applied to the backup tables yet.
This can happen in a number of ways:
Immediate synchronization
If the woocommerce_custom_orders_table_data_sync_enabled setting is set to true, synchronization happens automatically and immediately as soon as the orders are changed in the authoritative tables.
Manual synchronization
When immediate synchronization is disabled, it can be triggered manually via command line as follows: wp wc cot sync. It can also be triggered programmatically as follows:
$synchronizer = wc_get_container()->get(Automattic\WooCommerce\Internal\DataStores\Orders\DataSynchronizer::class);
$order_ids = $synchronizer->get_next_batch_to_process( $batch_size );
if ( count( $order_ids ) ) {
	$synchronizer->process_batch( $order_ids );
}
where $batch_size is the maximum count of orders to process.
Scheduled synchronization
If immediate synchronization gets activated (woocommerce_custom_orders_table_data_sync_enabled is set to true) while there are orders pending synchronization, an instance of DataSynchronizer will be enqueued using BatchProcessingController so that the synchronization of created/modified/deleted orders will happen in batches via scheduled actions. This scheduling happens inside CustomOrdersTableController, by means of hooking into woocommerce_update_options_advanced_custom_data_stores.
If for some reason immediate synchronization is already active but synchronization is not scheduled, a trick to restart it is to go to the settings page (WooCommerce - Settings - Advanced - Custom data stores) and hit "Save" even without making any changes. As long as "Keep the posts table and the orders tables synchronized" is checked the synchronization scheduling will happen, even if it was checked before.
If the woocommerce_auto_flip_authoritative_table_roles option is set to true (there's a checkbox for it in the settings page), the authoritative tables will be switched automatically once all the orders have been synchronized. This is handled by the CustomOrdersTableController class.
Deletion synchronization
Synchronization of order deletions is tricky: if an order exists in one set of tables (new tables or posts) but not in the other, it's not clear if the missing orders need to be created or if the existing orders need to be deleted. Theoretically, the orders missing from the backup tables imply the former and the orders missing from the authoritative tables imply the latter; but that's dangerous as a bug in the involved code could easily lead to the deletion of legitimate orders.
To achieve a robust order deletion synchronization mechanism the following is done. Whenever an order is deleted and immediate synchronization is disabled, a record is created in the wp_wc_orders_meta table that has deleted_from as the key and the name of the authoritative table the order was deleted from (wp_wc_orders or the posts table). Then at synchronization time these records are processed (the corresponding orders are deleted from the corresponding tables) and deleted afterwards.
An exception to the above are the placeholder records: these are deleted immediately when the corresponding order is deleted from wp_wc_orders, even if immediate synchronization is disabled.
When the "High-Performance Order Storage" and "Compatibility mode" are enabled, WooCommerce populates the HPOS tables with data from posts & postmeta tables. The synchronization between the tables is explained in detail in this document.
You can find a deeper explanation about the synchronization between the tables in this document about high-performance-order-storage-backward-compatibility-and-synchronization.
Placeholder records
Order IDs must match in both the authoritative tables and the backup tables, otherwise synchronization wouldn't be possible. The order IDs that are compared for order identification and synchronization purposes are the ones from the id field in both the wp_wc_orders table and the posts table.
If the posts table is authoritative, achieving an order ID match is easy: the record in wp_wc_orders is created with the same ID and that's it. However, when the new orders tables are authoritative there's a problem: the posts table is used to store multiple types of data, not only orders; and by the time synchronization needs to happen, a non-order post could already exist having the same ID as the order to synchronize.
To solve this, placeholder records are used. Whenever the new orders tables are authoritative and immediate synchronization is disabled, creating a new order will cause a record with post type shop_order_placehold and the same ID as the order to be created in the posts table; this effectively "reserves" the order ID in the posts table. Then, at synchronization time, the record is filled appropriately and its post type is changed to shop_order.
Order Data Storage
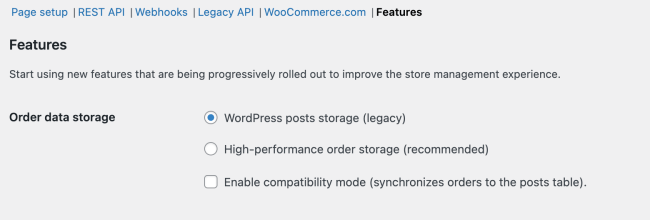
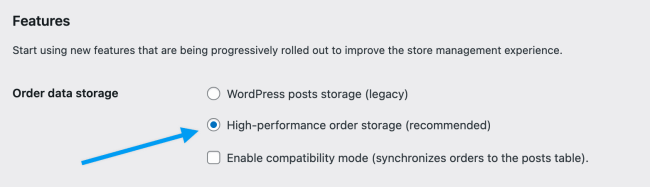
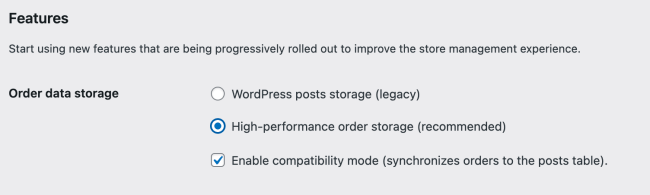
You can switch between data stores freely to sync the data between the tables.
- If you select "WordPress Post Tables", the system will save the order data within
_postand_postmetatables. The order tables are not utilized in this scenario.
- If you select "High-Performance Order Storage", the system will save the order data within the new WooCommerce order tables
- If you select "WordPress Post Tables" and "Enable compatibility mode", the system will sync the order data between the posts/postmeta and the WooCommerce order tables.
Incompatible Plugins
If you are using a plugin that is not compatible with High-Performance Order Storage, then the HPOS option will be disabled under WooCommerce > Settings > Advanced > Features.

- You can click on "View and manage" to review the list of incompatible plugins
- Or you can visit
https://example.com/wp-admin/plugins.php?plugin_status=incompatible_with_feature&feature_id=custom_order_tablesto review the list of incompatible plugins (please replaceexample.comwith your site domain)

Note: If you are using a third-party extension that isn't working properly with High-Performance Order Storage then please notify the developers of the extension and ask them to update their extension to add support for HPOS. It's up to the extension developers to add support for HPOS. We have developer resources and documentation available to help with their integration efforts.
Disabling HPOS
If you encounter problems or if you need to continue working with plugins that are not yet compatible with HPOS, then we recommend temporarily switching back to WordPress posts storage.
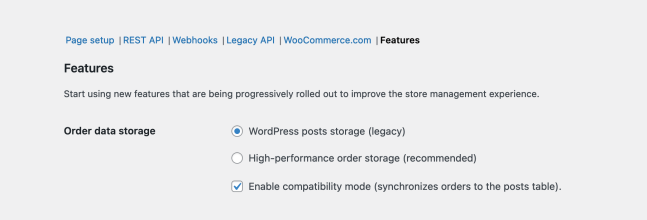
Once synchronization has completed, you can select WordPress posts storage (legacy) as your preferred option. You can also disable compatibility mode at this point. Once you are ready to re-enable HPOS, simply follow the instructions posted at the start of this doc. Finally, remember to save this page between changes!
As noted earlier, we also strongly recommend reaching out to the support teams of any plugins that are incompatible, so they can take corrective action.
Payments Guidelines
When building payments extensions, you should ensure you follow the WooCommerce Extension Guidelines.
Payments plugins come in many types: payment processors and gateways, wallets, Buy Now Pay Later, crypto, and more.
The choice between payment plugins depends on the specific needs and preferences of the merchant and their customers. Some merchants may choose to use multiple types of payment plugins to offer their customers a wider range of payment options.
A merchant can discover a payments plugin in the following ways:
- Through direct installation from WordPress plugins.
- Through Woo's public list of payment services on the Marketplace.
- Through the admin onboarding tasks and payments settings. To be added to the list of payment gateways in the Woo admin, the payments plugin must meet the criteria listed in these guidelines.